Aperture is the amount of light that a lens allows into a camera. A lens achieves this by using blades within the lens that open and close to leave a circle that allows light to pass through to the sensor. The larger the aperture, the more light the lens lets in. The smaller the aperture the less light it lets in.
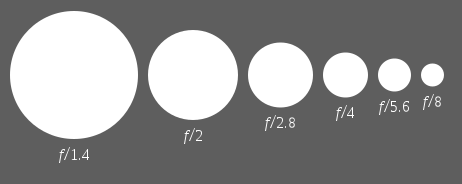
Aperture sizes are usually listed in F-numbers as seen in the above picture(courtesy of wikipedia), these "F-numbers" are calculated by dividing the Focal length of the lens by the diameter of the aperture. The smaller the F number, the larger the Aperture diameter and the more light that the lens allows in.
The aperture of a camera does not only affect the exposure of an image, it also controls the depth of field of the image. This is the range of focus that is available. The larger the aperture, the shallower the depth of field.

F/1.8 - As you can see, the depth of field is very shallow. This is a good effect for close up images where you want the viewer to focus on one object as it blurs out the rest for less distraction.

F/3.5

F/7.1

F/11

F/22 - As you can see, as the aperture gets increasingly smaller, the amount of the image which is in focus begins to grow quite dramatically until the point where the whole of the image is in focus. Smaller apertures are useful for Landscape photographs where there is a large range of the image which needs to be in focus.
Shutter speed.
The shutter speed of an image is measured in seconds or fractions of a second. The shutter speed is how long the shutter is held open to allow light in to the sensor. Obviously a fast shutter speed lets in less light than a longer shutter speed.
There are plenty of things that you can play about with concerning shutter speed, for example; water, fast shutter speeds can capture crisp images of flowing water, which can be nice, but sometimes you may want to create a more surreal image by using a slightly longer shutter speed and allow the water to blur and become almost mist like depending on how choppy the water is.
In these example images courtesy of Wikipedia the shutter speed value is listed in seconds in the bottom right hand corner of each image.


When shooting fast moving objects such as cars or sport you will want to use a fast shutter speed so that you can capture the image without potential motion blur, then again, that might be just the effect you are after. You then have the option to track with the moving object to keep the object crisp and the background blurred to create a sense of speed/movement or keep the camera still to have the object blurred creating the same effect.
Another example of experimentations with shutter speeds is of shooting light trails in the dark, because of the natural darkness you are able to shoot with much longer shutter speeds without sacrificing exposure. This can allow you to take images such as this one I took overlooking the A64

Film Speed(ISO)
Unlike traditional film, digital sensors do not have a fixed speed, so changing the ISO of the camera is now easily changeable on the fly. Film speed is essentially how sensitive the sensor is to light. The higher the sensitivity, the more light the sensor records. Unfortunately increasing the ISO also reduces the image quality due to the heat of the sensor, this can cause extra graininess and weaker shadows in the image.
Thankfully it is not usually necessary to stray from an ISO value of around 100-200 in natural light so high quality images are generally easy to create, but problems can arise in low lighting levels, especially when combined with fast moving objects.

ISO100

ISO200

ISO400

ISO800

ISO1600
As you can see, as I increase the ISO value, the image gradually loses quality. The difference between ISO100 and ISO1600 is quite astonishing, but if a certain shot requires the fast light capabilities of ISO1600 then I hopefully won't hesitate to use it.
Bringing everything together
With the 3 different ways that you can change the exposure of an image it is possible to expose the same image in hundreds of different ways depending on how you want the image to be perceived. What I do when I am about to take an image is I first check the conditions and evaluate what is and isn't possible with the given situation, then I decide what I want to do with the image and try and fit it into the possibilities that are available. If I primarily want a very shallow depth of field to create a certain focus in the image then I will first set the aperture as low as I want it to create the preferred depth of field and then change the shutter speed to a point where the in camera meter tells me the shot would be correctly exposed. I always try to work in ISO100 to keep my image quality as high as possible, but sometimes there just isn't enough light and no possibility to use a tripod when I'm setting up this kind of shot and inevitably I have to heighten the ISO until I can get the image how I want it.
This same shot could also be set up in many different ways in the same conditions to give the same exposure, for example.
I could set up my camera at 1/125 second, F/8, ISO400 to give me a pretty standard image, with nothing exaggerated. Alternatively I could set my camera up to 1/1000 second, F/1.4, ISO100 To give me a shallower depth of field, less chance for camera shake or motion blur and a less grainy image. Or alternatively still, I could set my camera up at 1 second, F/32, ISO50 which would give the same exposure but yet exaggerate the time value and give relatively blurred images when photographing moving subjects such as water or motor vehicles.
No comments:
Post a Comment